 By Andrew Armstrong
If your PC crawls every time Microsoft Defender runs a scan, you can tell it to back off. One PowerShell command does most of the work:
Set-MpPreference -ScanAvgCPULoadFactor 20That tells Defender to aim for an average of about 20% CPU while it scans, instead of the default 50%. But there is a catch that most guides miss: on its own, this setting only applies to some scans. This guide covers what the command does, which scans it affects, and the other settings you need if you want it to cover everything.
What ScanAvgCPULoadFactor actually does
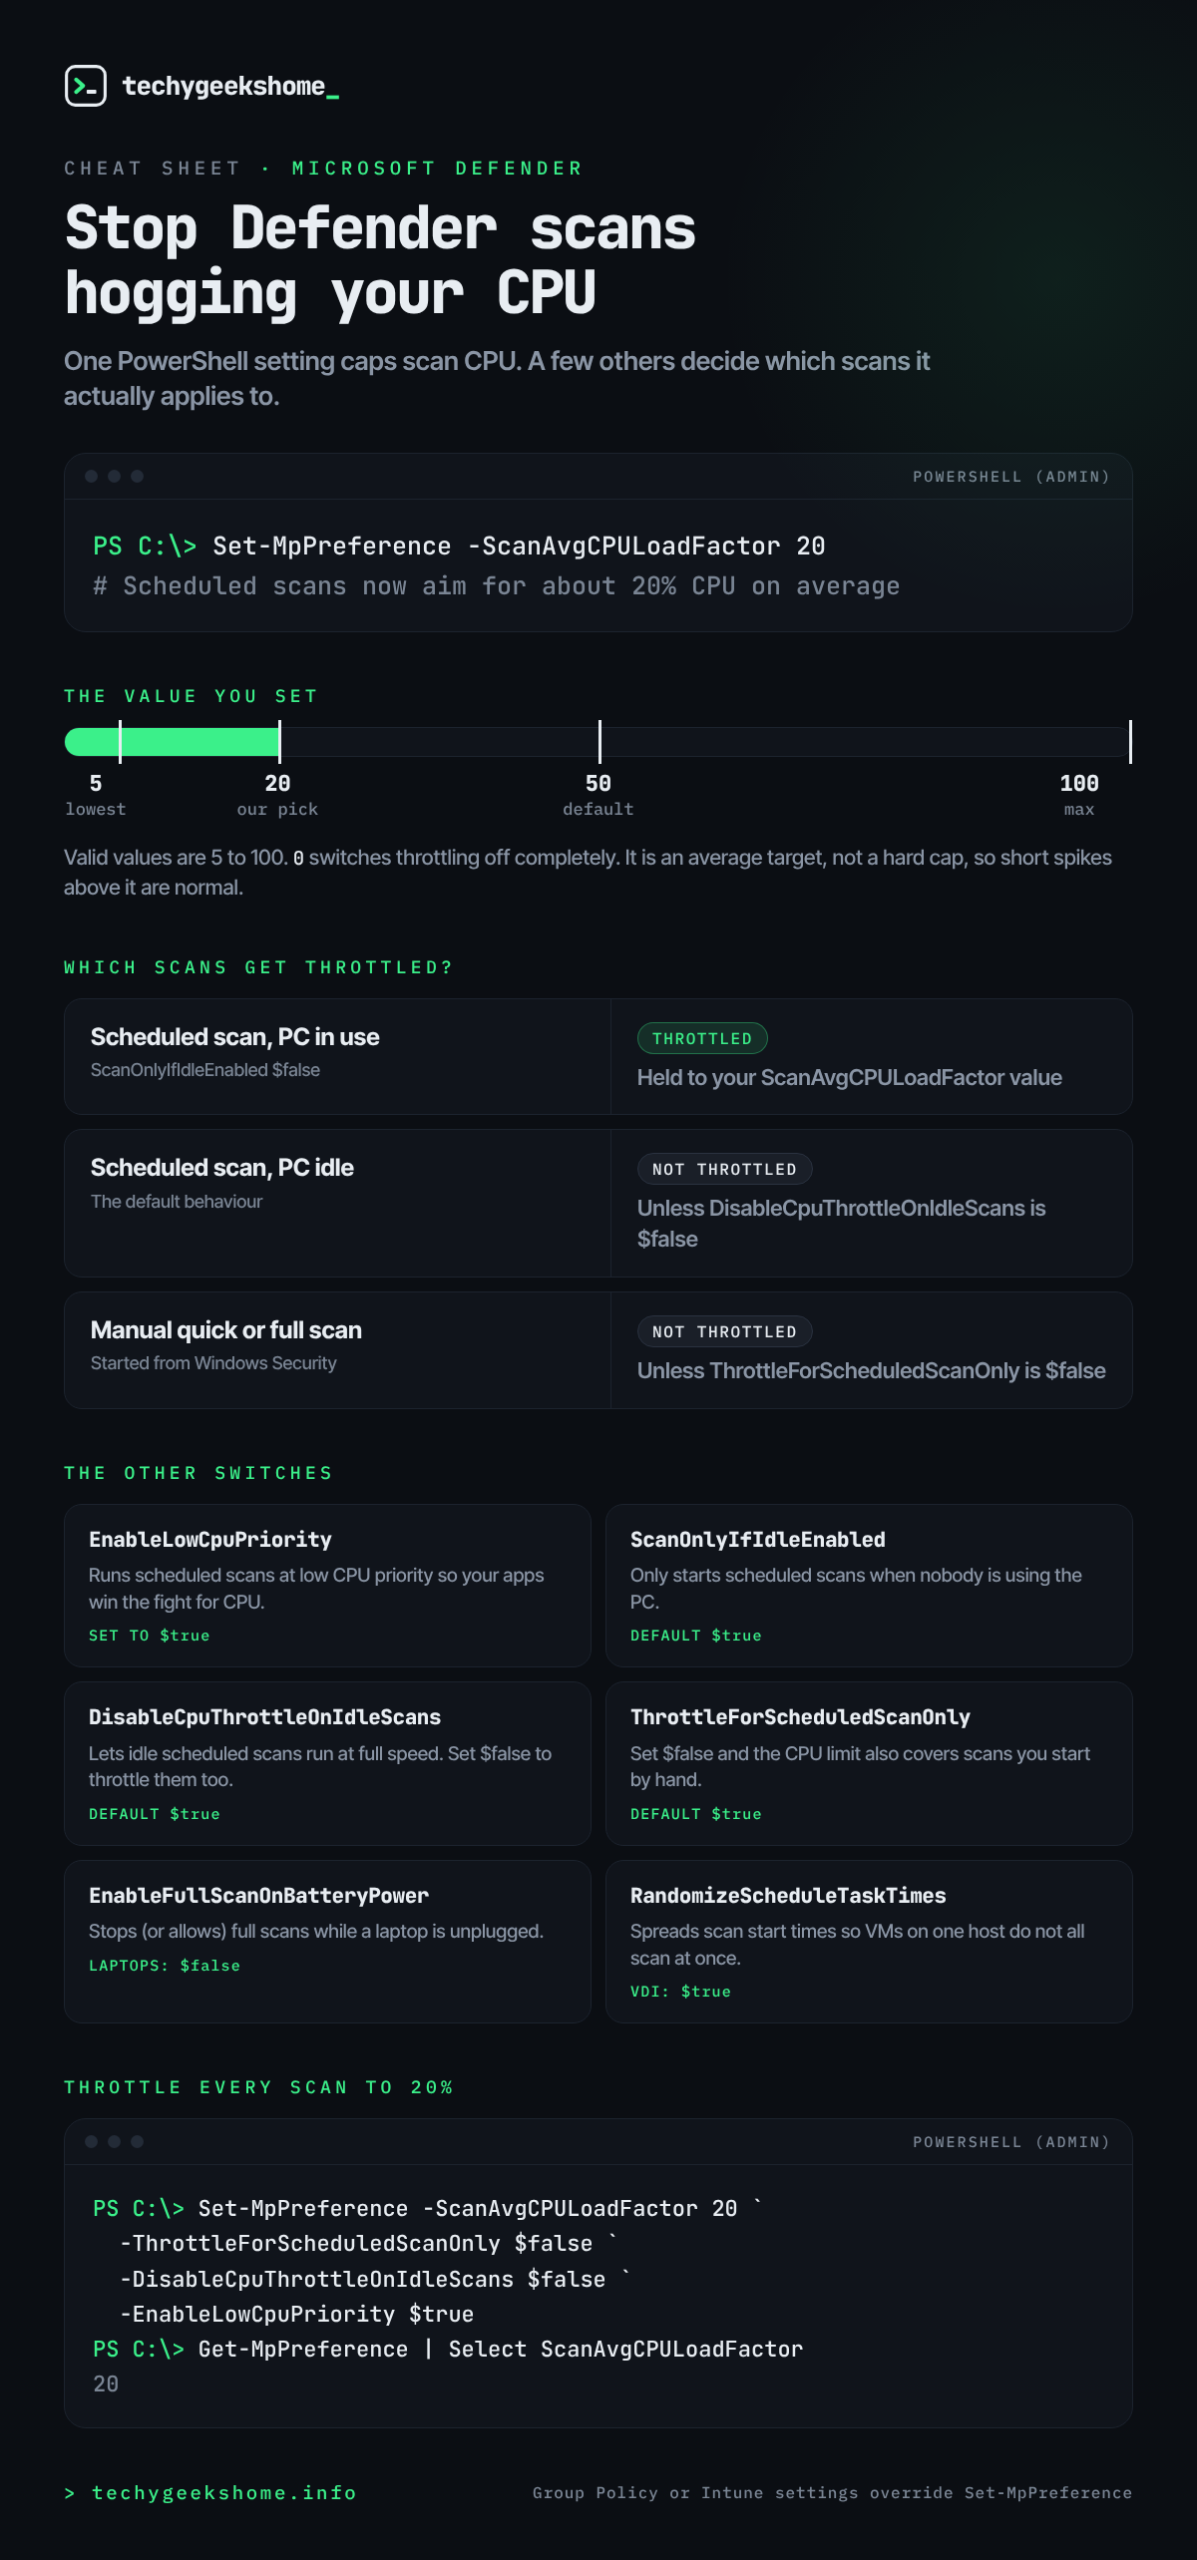
ScanAvgCPULoadFactor sets the maximum average percentage of CPU that Defender should use during a scan. A few things are worth knowing before you change it:
- Valid values are 5 to 100. The default is 50.
- 0 turns throttling off. Defender can then use as much CPU as it likes. Setting 100 has the same effect.
- It is an average, not a hard cap. Microsoft describes it as guidance for the scan engine. You will still see short spikes above the number you set.
- It needs an admin PowerShell window. Run it from a normal window and you get an access denied error.
To see what your PC is set to right now:
Get-MpPreference | Select-Object ScanAvgCPULoadFactor, ThrottleForScheduledScanOnly, DisableCpuThrottleOnIdleScans, ScanOnlyIfIdleEnabled, EnableLowCpuPriorityThe catch: which scans get throttled
This is where people get caught out. They set the value to 20, click Full scan in Windows Security, and watch MsMpEng.exe eat the CPU anyway. That is expected behaviour, because by default the limit only applies to scheduled scans.
- Scheduled scan while you are using the PC: throttled to your value.
- Scheduled scan while the PC is idle: not throttled, because
DisableCpuThrottleOnIdleScansis$trueby default. Defender assumes nobody minds if it goes flat out while you are away. - A scan you start yourself: not throttled, because
ThrottleForScheduledScanOnlyis$trueby default.
Microsoft also notes that ScanAvgCPULoadFactor is ignored completely when ScanOnlyIfIdleEnabled and DisableCpuThrottleOnIdleScans are both $true, which is exactly how a lot of PCs are set out of the box.
The other settings in this family
ThrottleForScheduledScanOnly
Set this to $false and the CPU limit applies to manual and custom scans as well. This is the one to change if full scans are what is slowing you down.
Set-MpPreference -ThrottleForScheduledScanOnly $falseDisableCpuThrottleOnIdleScans
Controls whether scheduled scans that run while the PC is idle ignore the limit. Set it to $false if you want those throttled too, for example on a laptop where you care about fan noise and heat even when you are not at the keyboard.
EnableLowCpuPriority
Runs scheduled scans at low CPU priority. This is different from a percentage limit: the scan can still use spare CPU, but anything you are actually doing gets first call. Used together with a sensible load factor, it is the most noticeable improvement on a busy desktop.
ScanOnlyIfIdleEnabled
When $true, scheduled scans only start when the PC is not in use. Set it to $false if you want scans to run at a fixed time regardless, such as a lunchtime quick scan on office PCs.
EnableFullScanOnBatteryPower
Set to $false on laptops so a full scan does not kick off and drain the battery while you are unplugged.
RandomizeScheduleTaskTimes
Spreads scheduled scan start times across a window. On a Hyper-V or VMware host running lots of VMs, or in a VDI estate, this stops every machine scanning at the same minute and flattening the host.
Throttle every scan in one go
If you just want Defender to stay out of your way whatever kind of scan is running, this sets everything at once:
Set-MpPreference -ScanAvgCPULoadFactor 20 `
  -ThrottleForScheduledScanOnly $false `
  -DisableCpuThrottleOnIdleScans $false `
  -EnableLowCpuPriority $true
Bear in mind the trade off. A full scan at 20% takes a lot longer than one at 50%, sometimes many hours on a big drive. That is fine for most people, but do not set it so low that full scans never get a chance to finish.
What value should you pick?
- Everyday desktop or laptop: 20 to 30, with low CPU priority on.
- Older or low power PC: 15 to 20. Scans take longer but the machine stays usable.
- Server with quiet overnight hours: leave the default 50 and schedule scans out of hours.
- VDI or a host full of VMs: 20 to 30, plus randomised schedule times.
Setting it with Group Policy, the registry or Intune
For more than a handful of machines, use policy rather than PowerShell. In Group Policy the setting lives at:
Computer Configuration > Administrative Templates > Windows Components > Microsoft Defender Antivirus > Scan
Specify the maximum percentage of CPU utilization during a scan
The policy writes a DWORD called AvgCPULoadFactor under HKLM\SOFTWARE\Policies\Microsoft\Windows Defender\Scan. In Intune you will find the same option in the Defender Antivirus settings of an endpoint security policy.
Important: policy wins. If a GPO or Intune policy sets a value, anything you run with Set-MpPreference is overridden. If your change does not seem to stick, run gpresult /h report.html and check whether a Defender policy is applied. Tamper Protection can also block local changes on managed devices.
Still slow? Find out what Defender is scanning
If throttling helps but the PC still struggles, the problem is often one folder or process that Defender keeps rescanning, such as a build folder or a database. Defender has a built-in performance analyser for exactly this:
New-MpPerformanceRecording -RecordTo C:\Temp\defender.etl
# reproduce the slowdown, then press Enter to stop
Get-MpPerformanceReport -Path C:\Temp\defender.etl -TopFiles 10 -TopProcesses 10
That shows you which files and processes cost the most scan time. If you do decide to add exclusions as a result, keep them tight and review them regularly. Our guide on auditing Microsoft Defender exclusions with PowerShell covers how to keep them under control.
How to undo it
To put everything back to the defaults:
Set-MpPreference -ScanAvgCPULoadFactor 50 `
  -ThrottleForScheduledScanOnly $true `
  -DisableCpuThrottleOnIdleScans $true
FAQ
Does ScanAvgCPULoadFactor affect real-time protection?
No. It only applies to scans. Real-time protection checks files as they are opened and is not controlled by this setting.
Does lowering it make my PC less secure?
Not directly. The scan checks the same files, it just takes longer. The only risk is setting it so low that full scans rarely complete.
Why is MsMpEng.exe still at high CPU after I set it?
Most likely you started the scan yourself, or a scheduled scan is running while the PC is idle. Set ThrottleForScheduledScanOnly and DisableCpuThrottleOnIdleScans to $false, then check that no Group Policy is overriding you.
Does it work on Windows Server?
Yes. The same cmdlet and settings work on Windows Server with Microsoft Defender Antivirus, and on Windows 10 and 11.
Discover more from TechyGeeksHome
Subscribe to get the latest posts sent to your email.
