Estimated reading time: 6 minutes
In Windows 7 there was an excellent tool called Windows Easy Transfer (WET) to transfer all your settings and data from one machine to another or to backup data to restore after a computer rebuild.
Well, Microsoft being the helpful company they are decided to remove this from Windows 10!
So, we are fighting back and showing you how to get WET to work on your Windows 10 machine.
Video Guide
We have created a walkthrough video on how easy it is to download and run Windows Easy Transfer on a Windows 10 computer. You can take a look at this, but we also suggest taking a read through our written guide, with screenshots to make this process as easy as possible for you.
Step-by-Step Guide
Below you will find a full set of written instructions with screenshots on how to get Windows Easy Transfer working for you.
First of all, you need to download the Windows Easy Transfer Package available by clicking the link below:
Download Windows Easy Transfer Tool
Included in this file are the 32-bit and 64-bit files you will require. Ensure that you use the correct one for your version of Windows 10.
You will need to copy the folder called “migwiz” from within the zip file:
Then you need to paste this folder into the following location on your Windows 10 machine:
C:\Windows\System32Note that we are assuming that your Windows installation is on the C: drive, if not, change the drive letter.
Then go into the “migwiz” folder and run the following file:
C:\Windows\System32\migwiz\MigSetup.exeThis will then start the setup process and launch the Windows Easy Transfer program.
If you want to use it in the future again, you can then run this file:
C:\Windows\System32\migwiz\MigWiz.exeThis will then launch the Windows Easy Transfer program:
You can then step through the wizard to select the options you want to use for backing up your original machine.
Windows Easy Transfer Wizard
Backing up your data
On the first page of the wizard, you will be given three options for how you want to transfer the data from your old machine to your new machine. These options are:
- An Easy Transfer Cable – it’s unlikely you will have one of these, but if you have, it means that you can transfer the data directly from your old machine to your new machine.
- A network – this is probably one that more IT professionals will use by taking advantage of a corporate network to remotely backup data from an end-users machine to a new machine or during a rebuilding phase.
- An external hard disk or USB flash drive – this is likely to be the most popular option with home users as it allows you to simply plugin in an external USB hard drive and back up to that device. Once the backup phase is complete, you can then plug the external USB device into your new machine and restore that earlier backup.
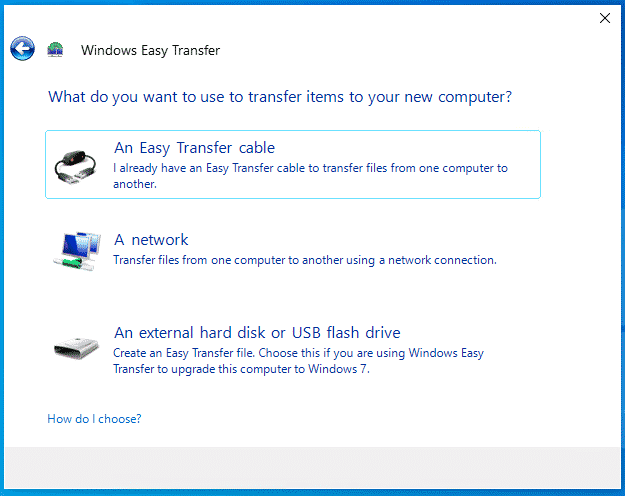
Once you have made your selection (we are going to go with the external hard disk option for this guide) you will be asked Which computer are you using now?:
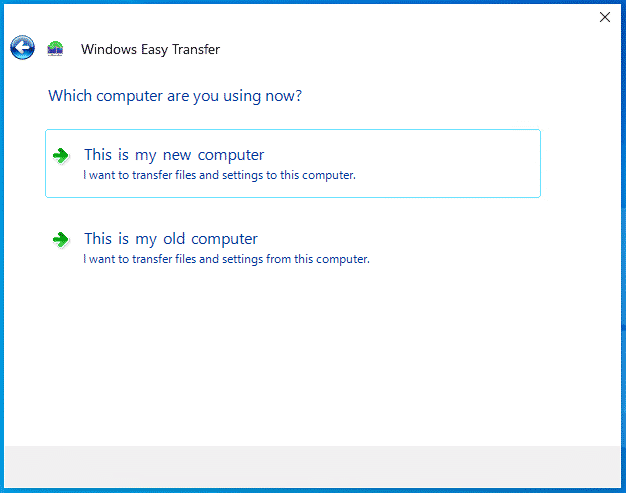
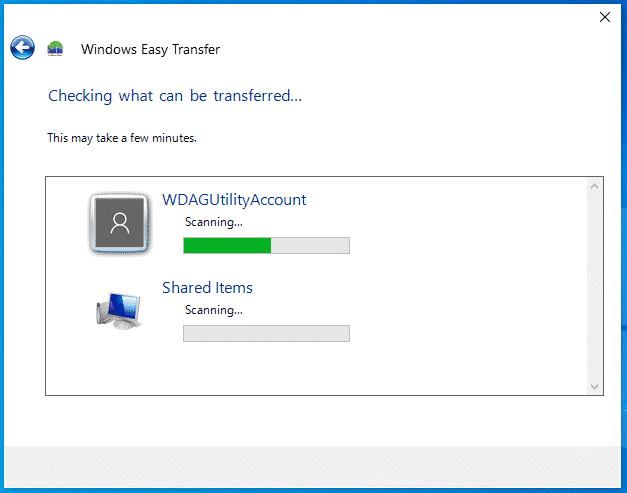
Select the option This is my old computer and the program will then go through your computer and check all the user and local profiles during a scan – this can take some time to complete depending on the size of data that you have on the machine:
When it has finished scanning for data, it will present you with the user profiles it can backup and you can then click on the Customize option to pick and choose what you want to actually backup from each profile:
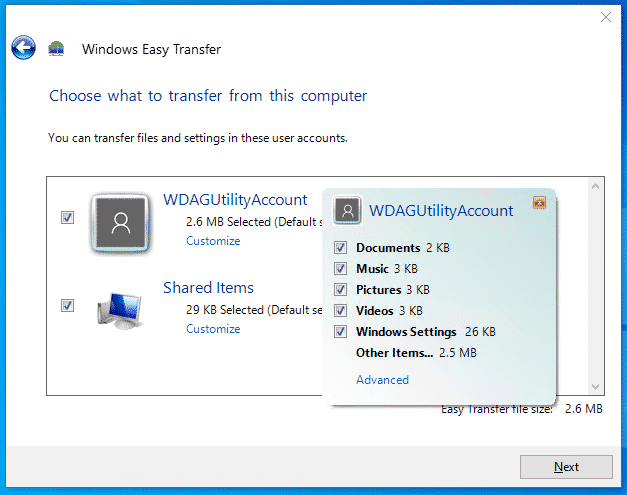
Once you are happy with your selections, click on the Next button. This will then take you to the page where you can enter a password to protect your data:
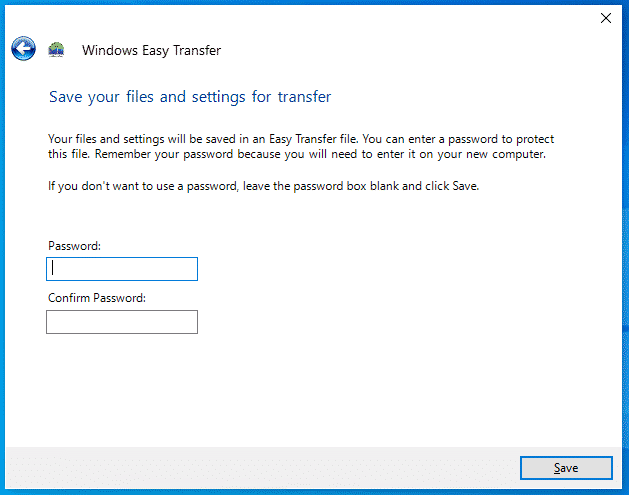
Then you will have the option of where you want to save the backup. The backup will consist of one single file. Ensure that you give it an appropriate name and click the Save button.
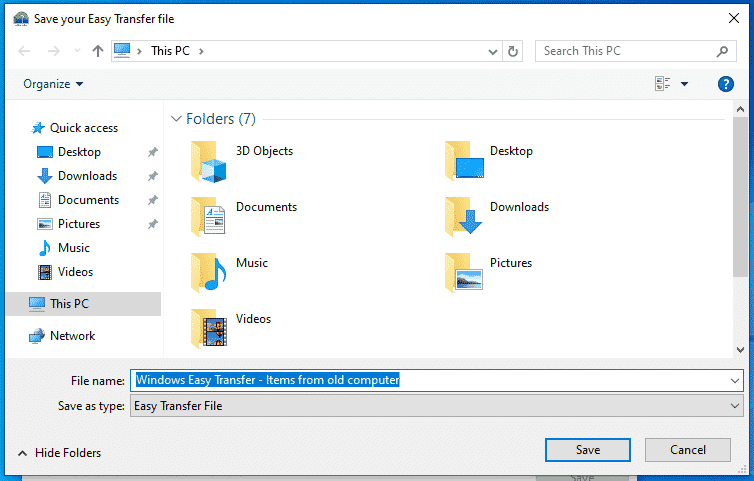
The backup will then start to run on your old machine, saving the backup file to the location that you selected.
Note that this process can take some time depending on factors like the amount of data you are backing up, whether you have an SSD or SATA hard drive, are you using a USB 2.0 or USB 3.0 external device. So be patient and wait for the backup to complete.
Restoring the Backup
Once your data has been successfully backup up, you will now want to turn your attention to the restoration of that data to your new machine.
To do this, you run through the same process as the backup to get Windows Easy Transfer running on your new machine. Then instead of selecting the This is my old computer, you select This is my new computer option.
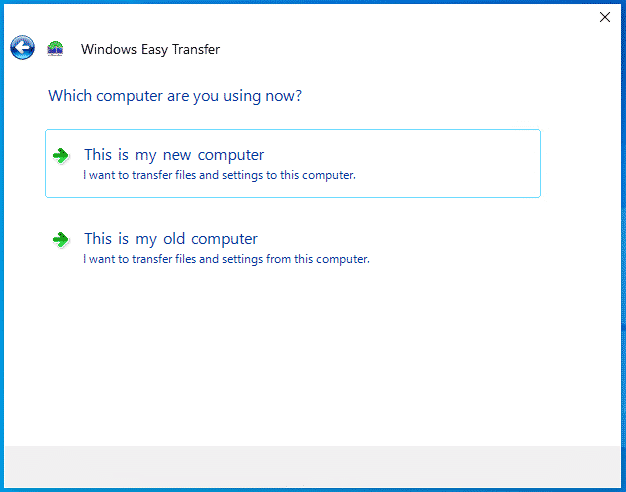
Then browse to where you saved your backup file from your old machine and you will then have the option to select what you want to restore as you did during the backup process.
Complete the wizard and the restore will begin.
Conclusion
That’s it! simple as that to bring back a tool that Microsoft should never have removed from Windows 10! This is an awesome tool but you also need to keep in mind that it is not overly intelligent. It is a big lift and shift type of tool so if you have any viruses or anything like that on your original machine – if you use this tool and accidentally backup a virus file, you will restore this virus file onto your new machine – so be careful with what you are backing up from the start.
Feedback
If you have any questions on this guide, please feel free to leave us a message below using our comments section and we will always endeavour to reply and help you out as soon as we can!
FAQ
Is there a Windows Easy Transfer for Windows 10?
Yes! Right here on our website, you can download the tool and we also provide step-by-step instructions on how to use it.
What happened to Windows Easy Transfer?
Windows Easy Transfer was a feature included in earlier versions of the Windows operating system, such as Windows XP, Vista, 7, and 8, that allowed users to transfer files, settings, and user profiles from one computer to another. However, this feature has been discontinued in Windows 10.
Does Windows 11 have Easy Transfer?
No, however, our free Windows Easy Transfer tool also works fully with Windows 11.
Share this content:


My laptop with a windows 7 screen was damaged so I removed the hard drive to connect a StarTech adapter cable for SATA drives to a new win10 laptop USB 3.1 port. The new laptop does not recognize the USB connection.
Will the WET procedure, above, assist in recognizing the USB connection and facilitate file movement between the old hard drive and the new laptop?
I also understand the new USB port driver may need an update and I also have read that the files once transferred may not properly work. Are these issues I should be concerned about?
I’m not real familiar with computers but can follow directions and those above seem easy to follow…Tank you in advance for your response.
Thanks for the great feedback.
So I connected a usb data cable.
WET tells me the cable is not visible?
Is there a solution for this problem?
I believe it has to be a special USB transfer cable. The one I have, has a circuit (rectangle) in the middle of the cable. You can’t use a plain USB to USB cable. Amazon sells data transfer cables, mine is made by Pluggable.
I also have that “entry point” error message and I can’t get past it. I tried to find the “C:\Windows\Installer\$PatchCache$\Managed\2D74839D66B94DC4AB460D2059236133\0.0.0” file that patanne listed on 22nd April 2019 at 14:56 but it says it can’t be found.
I have a Sony Vaio laptop with WIN 7 Home on it and I want to migrate all files and data to my brand new Lenovo 81MT laptop with Windows 10 Home on it.
I had the same problem with the TechyGeeksHome download. I had good success when I used the Softpedia download.
Try extracting the zip file download from us to a new folder under your C: drive and run it from there instead.
I am in the process of moving from Win 7 PC to a new Win 10 PC (Win 10 upgrade refused to co operate and the box Win 7 was on was aged) and this thread saved me lots of effort. I saved the Win 7 users and data away with Easy Transfer, stored on USB, installed Easy Transfer as per steps above on Win 10 box, ran Easy Transfer and users were created on Windows 10 box and data transferred. Even Outlook had all the configuration in place (though passwords had to be re entered).
5 stars for this advice – it saved a lot of effort and was straightforward.
Always nice to hear great feedback and that it has helped someone, so thanks.