Estimated reading time: 11 minutes
Introduction
I have recently been asked to report on Spotify installations within our SCCM environment. The reason is that the IT policies state that users should not be installing Spotify on company machines but a number of people have been caught with it installed.
So, the business managers want to know exactly who has it installed so that the end users can be spoken to and asked to remove the software.
Also, having spent some time Googling a query for Spotify, we found that there were not many solutions for reporting on this software so thought we would share our solution here.
For some reason, Spotify does not seem to present itself within the ARP data – we may be wrong but in our database, there was no data in the ARP for Spotify.
Guide
The following guide will walk you through how to monitor the spotify.exe file using SCCM software inventory and then how to query that data to produce a Power BI report.
I will also go through how to create a SCCM Collection for all installations of Spotify in your environment and then how to deploy a required uninstall to that collection.
Software Inventory
The first thing that will need to be set up is the collection of the spotify.exe file information. You can do this by carrying out the following steps:
- Open the SCCM Console
- Go to Administration > Overview > Client Settings
- Edit Your Default Device Settings
- Go to Software Inventory
- Click Set Types button
- Click the yellow sun (new) icon
- Type in spotify.exe
- Configure the other settings how you want or leave as default
- Click OK and exit the Settings
Dependant on your Software Inventory timing settings, this new configuration will be pushed out to your end users machines and then they will start to report back to the SCCM database.
Like everything with SCCM, it takes time so give it at least a few days before you start seeing some decent data coming through.
SQL Data and Query
Now we are collecting the spotify.exe file information within our software inventory, we can make use of the SoftwareFile and SoftwareInventory tables in the SCCM SQL database.
The SQL query you can use is as below:
SELECT
     *
FROM v_GS_SYSTEM SYS
     INNER JOIN SoftwareInventory SWI
          on SYS.ResourceID = SWI.ClientId
     INNER JOIN SoftwareFile SWF
          on SWF.ProductId = SWI.ProductId
     WHERE SWF.FileName = 'spotify.exe'
Although this will bring back all of the columns, I suggest that you change the * for just the columns that you actually require. Once you are happy with your query in SQL, we can move onto Power BI.
Power BI Report
Advanced SQL Query
You will probably want to know who has Spotify installed and on what machine, so when moving onto the Power BI report, you can use a query like this:
SELECT DISTINCT
     COMP.UserName0 AS [User],
     COMP.Manufacturer0 AS [Make],
     COMP.Model0 AS [Model],
     COMP.Name0 AS [Computer],
     SYS.SystemType0 AS [Architecture],
     SWI.ModifiedDate AS [Install Date],
     SWF.FileName AS [Filename],
     SWF.FileDescription AS [Product],
     SWF.FileVersion AS [Version]
FROM v_GS_SYSTEM SYS
     INNER JOIN SoftwareInventory SWI
          on SYS.ResourceID = SWI.ClientId
     INNER JOIN SoftwareFile SWF
          on SWF.ProductId = SWI.ProductId
     INNER JOIN v_GS_COMPUTER_SYSTEM COMP
	  on SYS.ResourceID = COMP.ResourceID
     WHERE SWF.FileName = 'spotify.exe'
Power BI Get Data
You can now open up Power BI Desktop Client and click on the Get Data icon and select SQL Server:
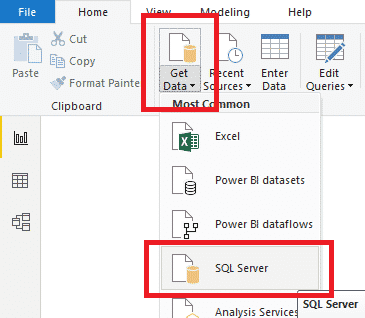
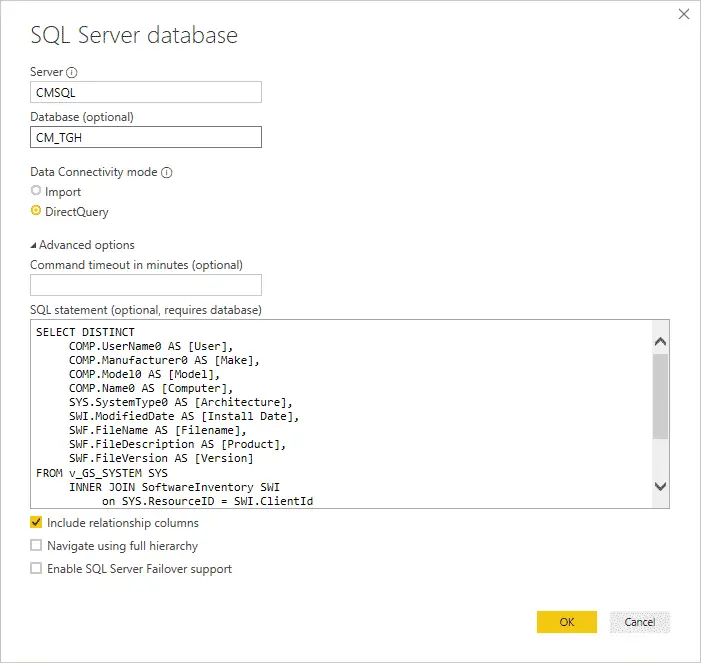
This will bring up a box where you should enter your own SCCM SQL database server and SCCM database name:

Then select the DirectQuery radio button and copy and paste the SQL query from earlier in this guide into the box and click the OK button:
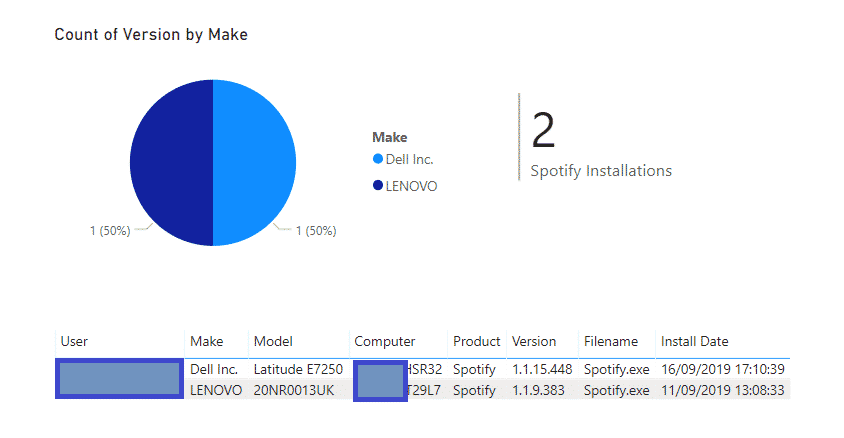
Load the acquired data into the Power BI and you can then start to design how you want your report to look using the different tool sets available to you in Power BI. You should then end up with something like this (depending how many installations you have in your environment.
SCCM Automatic Uninstall
Now that you have your SCCM system monitoring which computers have Spotify installed on them and you can now see that information in a tidy Power BI report, you may want to act on getting Spotify removed.
But, you don’t have to do this manually like the old days. We can now setup a collection in SCCM using a WQL variant of our original SQL query as the direct query for our collection. This will then populate, automatically and in the future, the collection with any Spotify installations that are found.
We then deploy the Spotify uninstall command to that collection. This means that even if someone installs or reinstalls Spotify in the future, SCCM will just uninstall it again!
Spotify SCCM Collection Setup
To create a new SCCM collection, go to the following location:
Assets and Compliance > Overview > Device CollectionsRight-click on Device Collections and select Create Device Collection:

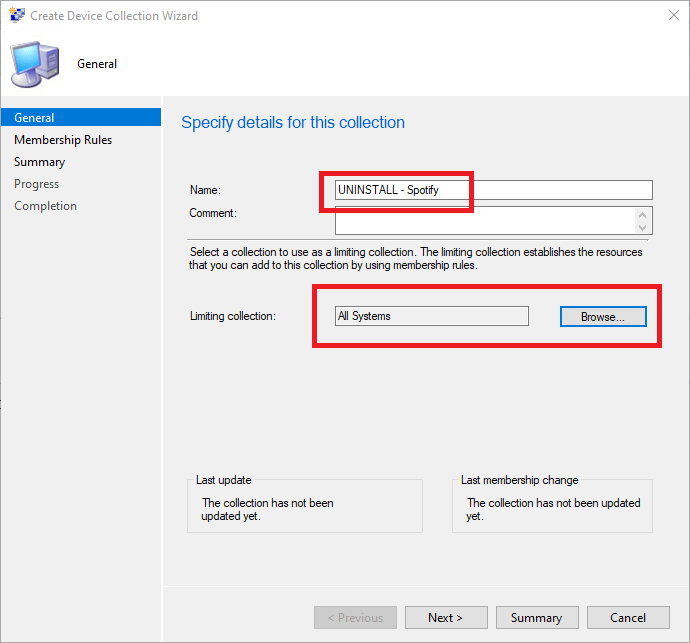
The Create Device Collection Wizard will pop up and you should give your new collection an appropriate name. Also set the limiting collection, which, for this guide purpose I’ll set to All Systems:
Then click the Next button to go to the Membership Rules page.
Click on the Add Rule button and from the drop-down select Query Rule:

This will pop up the Query Rule Properties box. Give it a name and then click on the Edit Query Statement button:
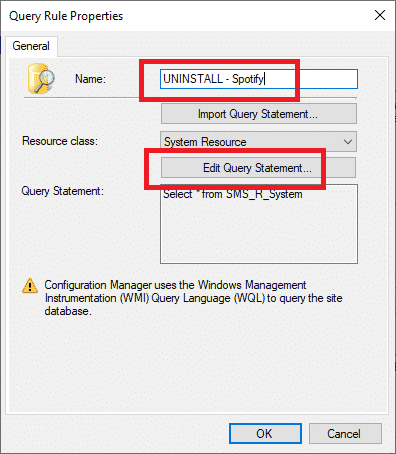
Then click on the Show Query Language button:
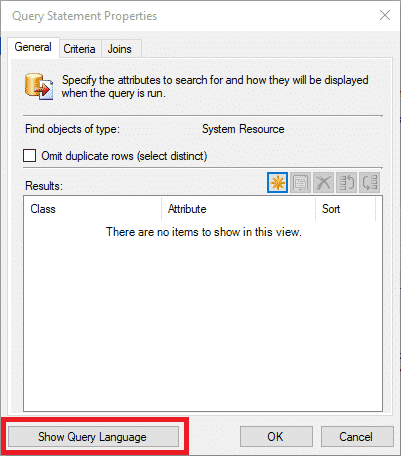
WQL Query
This is where you now need to copy and paste the following WQL Query:
select SMS_R_SYSTEM.ResourceID,SMS_R_SYSTEM.ResourceType,SMS_R_SYSTEM.Name,SMS_R_SYSTEM.SMSUniqueIdentifier,SMS_R_SYSTEM.ResourceDomainORWorkgroup,SMS_R_SYSTEM.Client from SMS_R_System inner join SMS_G_System_SoftwareFile on SMS_G_System_SoftwareFile.ResourceID = SMS_R_System.ResourceId where SMS_G_System_SoftwareFile.FileName = "spotify.exe"Click on the OK button and progress to the next page in the wizard.
If you now update your newly created collection, you should see the same amount of devices in there as in your Power BI report:

Spotify Uninstall Package
Now that we have our SCCM collection automatically updating itself based on the spotify.exe being on an end users device, we now want to uninstall it automatically.
To do this, we will create a package in SCCM and using the standard Spotify uninstall command, push the package to the collection as a required uninstallation.
Create the SCCM Package
Head back to your SCCM console and go to here:
Software Library > Overview > Application Management > PackagesRight click on Packages and click Create Package:

This will bring up the Create Package and Program Wizard. Give your new package and appropriate name and fill out the other details. No need to enter a source at the moment, then click on the Next button:

Now on to the next page in the wizard, you should click on the Do not create a program radio button and click Next:

Then click through the rest of the wizard and click the Close button at the summary page.
Now open a text editor (like Notepad or Notepad++) and copy and paste the content below:
c:
cd
cd %appdata%
cd spotify
spotify.exe /UNINSTALL /SILENT
Now save the text file as spotify-uninstall.bat – ensuring that the bat file does not have the .txt file extension at the end.
Now take the spotify-uninstall.bat file and put it in your SCCM package sources location.
Back in your SCCM console, right click on your package and select Create Program:

This will bring up the wizard page again – click on the Standard program radio button and click the Next button:

Now on the program details, you need to give the program a name, browse to the source of your .bat file for the command line and ensure that it is Run with user’s rights:

Click the Next button to go to the next page where you can set requirements if you want to, but for the purposes of this guide, I’ll leave the settings as default and move on.
You can then click through and complete the wizard.
The final part is to set the source path and distribute and deploy the newly created package. Right-click on the package and select Properties. Then from the tabs at the top of the pop-up, select Data Source and tick the box This package contains source files click the Set button and browse to the location of your .bat file:

Once you are happy with all your settings, you can click the OK button and then distribute the source package to your distribution points.
Deploy to Collection
Now right-click on the package and click Deploy:

The wizard will appear again and now click the Browse next to the Collection and select the Spotify Uninstall collection you created at the start of this guide:

Then on the Deployment Settings page, ensure that the Purpose drop down is set to Required:

You can then go through and complete the wizard.
FAQ
Why would someone want to remove Spotify?
There are several reasons why someone might want to remove Spotify, such as switching to a different music streaming service, wanting to free up storage space on their device, or simply not using the service anymore.
How do I cancel my Spotify subscription?
To cancel your Spotify subscription, log in to your account on the Spotify website, go to the u0022Subscriptionu0022 page, and click on u0022Cancel Subscription.u0022 Follow the prompts to complete the cancellation process.
Will I lose my playlists and saved songs if I remove Spotify?
Yes, if you remove Spotify from your device, you will no longer have access to your playlists and saved songs unless you export them before removing the app. You can export your playlists as a .csv file and your saved songs as a .txt file.
How do I export my playlists and saved songs from Spotify?
To export your playlists and saved songs from Spotify, log in to your account on the Spotify website, go to the playlist or saved songs page, click on the three dots next to the playlist or song, and select u0022Share.u0022 Choose the u0022Copy Playlist/Song Linku0022 option and paste it into a text editor or spreadsheet. Save the file as a .csv or .txt file.
Can I remove Spotify from all of my devices at once?
No, you will need to remove Spotify from each device individually. If you have multiple devices with the app installed, you will need to go through the removal process on each device.
Will removing Spotify also cancel my subscription?
No, removing the Spotify app from your device does not automatically cancel your subscription. You will need to cancel your subscription separately by following the steps outlined on the Spotify website.
Can I reactivate my Spotify account after removing it?
Yes, you can reactivate your Spotify account at any time by logging back in to your account and resuming your subscription. However, your playlists and saved songs may no longer be available unless you exported them before removing the app.
Conclusion
That is the end of the guide! SCCM should now automatically take care of uninstalling any Spotify installations that your end users put onto their corporate devices!
The software inventory will gather the data if Spotify gets installed at the end users machine. The Power BI report will show you who has installed it. The device will be added to the uninstall collection automatically and then the package deployment will uninstall Spotify from the user’s machine!
Everything is automated so you don’t have to worry about it any more!
This process can obviously be used for any other programs that you may want to automatically uninstall like iTunes, Dropbox etc.
More Queries
Our full range of SQL and WQL Collection queries is available here.
Feedback
If you have any questions or feedback about this post, or if you would like us to create any queries for you, please go ahead and leave us a message below in the comments section and we will get back to you as quick as we can.
Share this content:



Hey. I think that will be not works with Spotify installed from MS Store beacause there is not spotify.exe in c:\users\xxxxx\appdata ;/ What are you thinking about it? I am trying to uninstall Spotify but my affords go for nothing ;/
Not sure about the store based app to be honest, something we will have to look into.