 By Andrew Armstrong
Instructions
So the first thing you will want to do when your task sequence stops is to click the back button so that the machine does not automatically reboot or you don’t accidently reboot the machine yourself. Then go ahead and press the F8 key to bring up a command box (this is assuming that you have enabled Command Support in your boot image). You should then follow these simple steps to create the correct disk partitions.- Type diskpart and press the enter key
- Type list disk and press the enter key
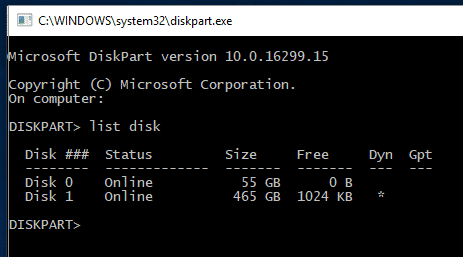
- For this guides purposes, we will go ahead and use Disk 0
- Type select disk 0 and press the enter key (amend the 0 if required)
- Type clean and press the enter key (this will remove all partitions on the disk)
- Type convert gpt and press the enter key (this will convert the disk to GPT)
- Type create partition efi size=200 and press the enter key (this will create the EFI system partition)
- Type assign letter=x and press the enter key (this will assign the letter x to this partition but you can use any available drive letter)
- Type format fs=FAT32 quick and press the enter key (this will format the ESP to the FAT32 file system, quickly)
- Type create partition msr size=128 and press the enter key (this will create the MSR partition)
- Type create partition primary and press the enter key (this will create the Windows partition)
- Type assign letter=c and press the enter key (this will assign the drive letter C to the Windows partition)
- Type format fs=NTFS quick and press the enter key (this will format the primary partition to the NTFS file system, quickly)
Feedback
If you have any questions or feedback on this guide, please feel free to leave us a message below in the comments section and we will get back to you as soon as we can.⬇️
Get the download
How to create correct partitions to deploy a Windows image to a UEFI based device: Free eBook is available as a free download.
Download Now →🛠️
Gear We Recommend
Testing configs is easier with a dedicated admin machine set up right. Here’s the kit we use.
Browse our Windows Admin Toolkit picks on AmazonAs an Amazon Associate, TechyGeeksHome earns from qualifying purchases.
Discover more from TechyGeeksHome
Subscribe to get the latest posts sent to your email.
