Estimated reading time: 8 minutes
There are two methods to deploying Java Clients, using MSI or Offline Installation files. This guide will step you through the process of gathering and using both.
Offline EXE Silent Installation Instructions
You will need to use the Offline Installer that is available from the Java website and then add on the parameters that you require for your own environment.
Below are the parameters, switches and examples for a Java silent install. The Java Windows offline installer command has following syntax:
<jre>.exe [/s] [INSTALLDIR=<drive>:<JRE_install_path>] [STATIC=1] [WEB_JAVA=0/1] [WEB_JAVA_SECURITY_LEVEL=VH/H/M/L]where:
- <jre>.exe is the single executable installer for Java
- /s, if used, indicates silent installation
- INSTALLDIR, if used, specifies the drive and path of the JRE.
- If INSTALLDIR is not specified, the installation will go into C:Program Filesjavajre (default location).
- STATIC=1, if used, specifies a static installation.
- WEB_JAVA=0, if used, disables any Java application from running in the browser.
- WEB_JAVA=1, the default, enables Java applications in the browser.
- WEB_JAVA_SECURITY_LEVEL: if used, sets the security level of unsigned Java apps running in a browser. The possible values for this field are V (very high), H (high), M (medium, the default) or L (low).
Example 1
Suppose the Java installer is jre-7-windows-i586.exe and you want to install the following configuration:
- Perform a Windows Installation
- Install the JRE core, additional fonts, colors, and Soundbank
The command to install the above mentioned configuration is as follows:
jre-7-windows-i586.exe /sExample 2
Suppose the JRE installer is jre-7-windows-i586.exe and you want to install the following configuration:
- Perform a Windows Offline Installation and install the JRE on D: drive at javajre
- Have all features of the JRE installed
The command to install the above mentioned configuration is as follows:
jre-7-windows-i586.exe /s INSTALLDIR=D:javajreNote:
To keep the MS-DOS window open, until the installation of Java is complete use the start /w command as follows:
start /w jre-7-windows-i586.exe /sCreating a Log File
Log file can be used to verify if an installation succeeded. To create a log file describing the installation append /L C:setup.log to the install command and scroll to the end of the log file to verify.
The following is an example for installation:
jre-7-windows-i586.exe /s /L C:\setup.logThe above command causes the log to be written to the setup.log file, this is our personal favourite and we have the log file point to a server share so that we can keep an eye on any failed log file installations.
MSI Installation Instructions
The first thing you will want to do is to download the latest Java MSI installers from the link below:
If you need a previous version of the Java MSI installers, you can get them from our Sourceforge project site using the link below:
If you want to run the MSI installers as silent, then you can use the following command:
msiexec.exe /i "javainstaller.msi" /q /norestartwhere:
- msiexec.exe – this starts the MSI installer engine
- /i – this tells the msiexec.exe to run an install
- “MSIinstaller.msi” – filename of the MSI installer
- /q – tells the msiexec.exe to run as silent
- /qb – tell the msiexec.exe to run as automated with no modal options
- /qb+ – same as above but will end with a wizard box telling you or the end user that the installation process has completed
- /passive – tells the msiexec.exe to run as automated but display to end user
- /norestart – tells the msiexec.exe to not allow an automatic restart after installation completion
MSI Installers for Automated Installation with a GUI
If you want to run the MSI installers as automated but displayed to the end user, then you can use the following command:
msiexec.exe /i "MSIinstaller.msi" /passive /norestart
Parameter Options
where:
- msiexec.exe – this starts the MSI installer engine
- /i – this tells the msiexec.exe to run an install
- “MSIinstaller.msi” – filename of the MSI installer
- /q – tells the msiexec.exe to run as silent
- /qb – tell the msiexec.exe to run as automated with no modal options
- /qb+ – same as above but will end with a wizard box telling you or the end user that the installation process has completed
- /passive – tells the msiexec.exe to run as automated but display to end user
- /norestart – tells the msiexec.exe to not allow an automatic restart after installation completion
You can also use different parameter options to carry out an uninstall. All you need to do is to change the /i parameter for a /x parameter. This will then tell the MSI to run an uninstall instead of an installation.

Uninstalling the old version of Java Client using MSI Installer
Run the following command to uninstall the JRE:
32-bit JRE:
msiexec /x {26A24AE4-039D-4CA4-87B4-2F83218025F0} /qb /norestart64-bit JRE:
msiexec /x {26A24AE4-039D-4CA4-87B4-2F86418025F0} /qb /norestartThe value in curly braces is the MSI product code for the JRE you want to uninstall. The text in blue, 18025, correlates to the JRE version 1.8.0_25. Modify the MSI product code accordingly depending on the JRE version that you want to uninstall.
Using the old version of Java Client using Offline EXE Installer
You can use this simple command to carry out the uninstall of old versions of Java Client (silently due to the /s variable):
jre1.8.0_91.exe /s REMOVEOUTOFDATEJRES=1But if you want to carry out more advanced changes, you will need to create a configuration file to use alongside the offline EXE installer. So, create a text file, save it as a .cfg extension and you should use the options below to carry out what you want to do with your installer:
You also have all of these options to add to your configuration file:
- INSTALL_SILENT=Enable, Disable
- INSTALLDIR=PATH
- AUTO_UPDATE=Enable, Disable
- WEB_JAVA=Enable, Disable
- WEB_JAVA_SECURITY_LEVEL=H (high), VH (very high)
- EULA=Enable, Disable
- REBOOT=Enable, Disable
- NOSTARTMENU=Enable, Disable
- SPONSORS=Enable, Disable
The command line you would then use to run the offline installer and configuration file would be:
jre1.8.0_91.exe INSTALLCFG=PATH/configfile.cfgExtraction
If you wish to extract the MSI file yourself from the offline installer for Java, then you can follow this simple guide:
Once you have the executable installer you should launch the file until you get to the “Welcome to Java” dialogue page. You should not click the Install button, instead, navigate to your local appdata folder (the user Application Data folder). The location of the local appdata folder is different for each Windows platform.
Note: You can navigate directly to your appdata folder by typing from a run box:
%APPDATA%The different locations for the local appdata folders per operating system are below:
NOTE: from version 8 update 60, replace “Sun” with “Oracle” for this part.
Windows Vista and Windows 7
C:\Users\<username>\AppData\LocalLowSun\Java\jre<version_number>Version 8 update 60 onward
C:\Users\<username>\AppData\LocalLow\Oracle\Java\jre<version_number>Windows XP
C:\Documents and Settings\<username>\Local Settings\ApplicationData\Sun\Java\jre<version_number>Version 8 update 60 onward
C:\Documents and Settings\<username>\Local Settings\ApplicationData\Oracle\Java\jre<version_number>Windows 2000
C:\Documents and Settings\<username>\ApplicationData\Sun\Java\jre<version_number>Version 8 update 60 onward
C:\Documents and Settings\<username>\ApplicationData\Sun\Oracle\jre<version_number>The jre<version_number> folder will contain two files (one MSI file version 8 update 60 onwards):
- Data1.cab
- jre<version_number>.msi
Copy the MSI and CAB files from the appdata folder and into a new folder on your desktop (or any other temporary location).
Now, going back to your Java installation, click the Cancel button to terminate the installation. There is no need to continue installation after the MSI and CAB files have been extracted.
You can now use these two files to distribute over your network in your preferred method.
Version 8 Update 60 and above – MSI tweak for deployment
You may notice that using the extracted MSI files from version 8 update 60 and above, does not work. This is due to a setting within the MSI that needs to be changed.
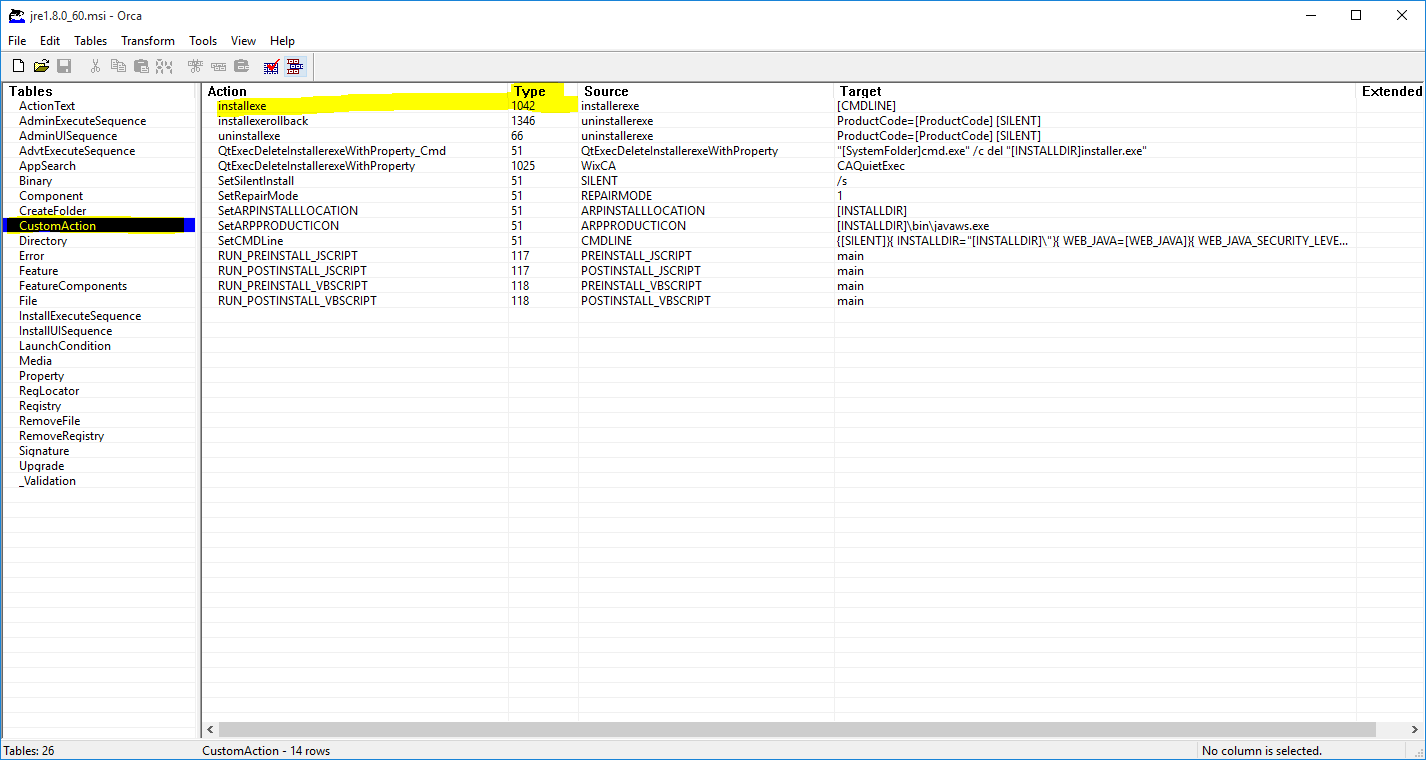
Using Orca, edit the MSI file and go to the CustomAction table and look for “installexe“. Then look for the Type – this should be 1042 like below:

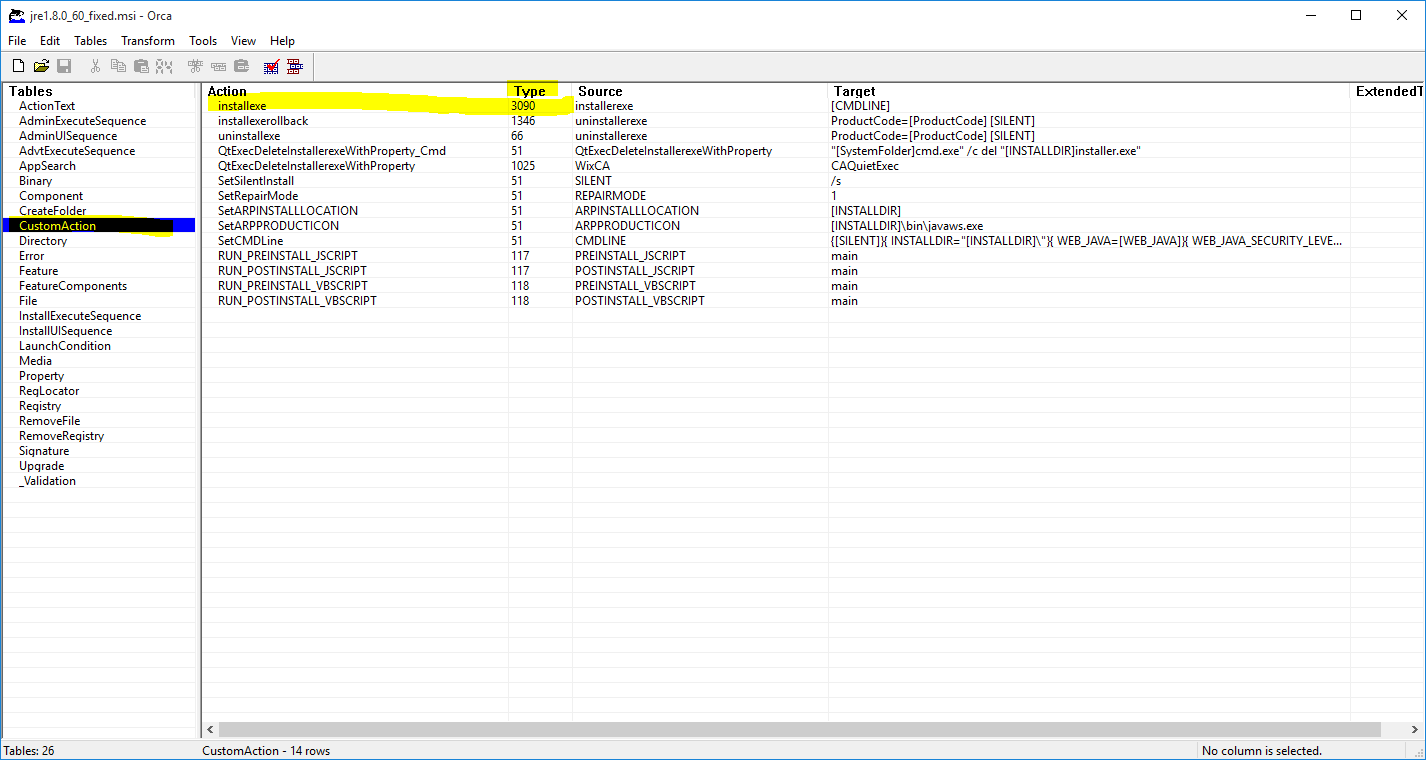
This needs to be changed to “3090” and then save the MSI file like below:

Uninstall Previous Versions
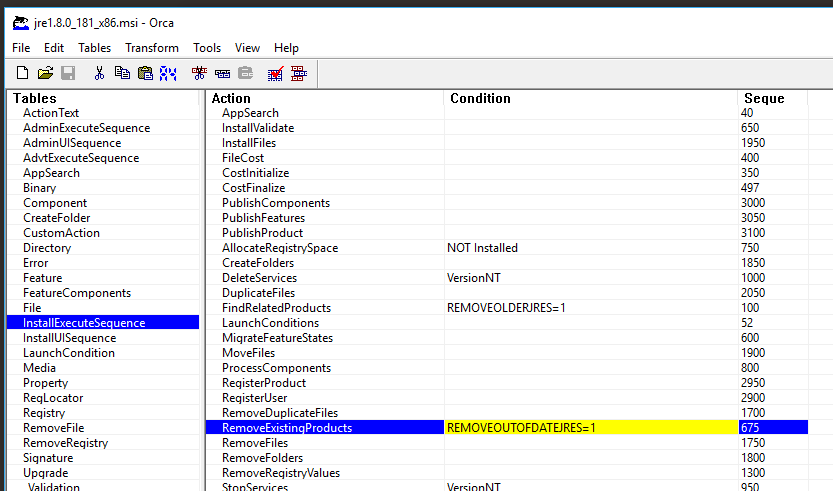
There is also a change that has to be made to the MSI to enable the new version to uninstall the old version. To do this, edit the MSI in Orca like above, then go down to the InstallExecuteSequence secetion on the left side menu, then go to RemoveExistingProducts and change the value to:
REMOVEOUTOFDATEJRES=1
Save the MSI and then you can then use this MSI file for network distribution.
Feedback
We would love to hear your feedback on this article so come and join us on Facebook or Twitter and let us know what you think!
Share this content:

You can always use our MSI Downloader as well now for Java MSI installers.
Your MSI downloads page is not working I’m unable to access any offline installers / MSI packages for java
Hi – please see details here: https://techygeekshome.info/2018/11/removal-of-msi-installers-and-3rd-party-logos/
I tested several MSi x86 versions on XP, Everithing is OK.
Thanks a lot
I tested several MSi x86 versions on XP, Everithing is OK.
Thanks a lot
Your MSI downloads page is not working I’m unable to access any offline installers / MSI packages for java
Hi – please see details here: https://techygeekshome.info/2018/11/removal-of-msi-installers-and-3rd-party-logos/