Estimated reading time: 4 minutes
Are you using AMP but now you want to create AMP reports in Google Analytics? Then this guide is for you!
Accelerated Mobile Pages (AMP) seems to be all the rage at the moment. This is because with the advancement of technology with smart phones and tablets, more people are using the internet on smaller screens than ever and this trend is only going to keep going that way.
So when you browse to a website that is using AMP, you will get a sort of stripped back version, a lite version, something quick and simple to load up on a mobile device.
On our blog, we have actually just started using AMP. We had been testing it for a few months and it has been tricky in getting it right for the look of our site and also for the internal linking. Sometimes the AMP would show up for the landing page, but then clicking on an internal link took the visitor to the desktop version. So if you are going to use AMP, make sure you test everything, including links to ensure that you get it right. We do believe that we now have everything correct and should you be viewing our site on a mobile AMP version, we would love to hear your feedback by leaving us a message in the comments section.
You should also ensure that you have AMP reports available to you from whatever analytics system you are using to keep track of AMP visitors and how they are using your site.
As we were testing our AMP pages, we noticed that there are not many AMP reports available for Google Analytics, which is what we use for our site traffic analysis. This lead us to create our own custom AMP reports for all AMP traffic. We will go through the steps to create this report for your own sites.
Prerequisites
For this to work, you need to ensure that you have setup your site for AMP Google Analytics tracking first. There is a guide on how to do this from Google here. Without this, your AMP reports will just be blank.
AMP Reports in Google Analytics Guide
So, first things first. Login to your Google Analytics portal and head to the Administration page.
Creating the Content Grouping
We are going to use Google Analytics Content Grouping to distinguish visitor hits between AMP and non-AMP.
To do this, we need to create the two content groups, so from within the Administration page, on the right side of the three panels, click on Content Grouping:

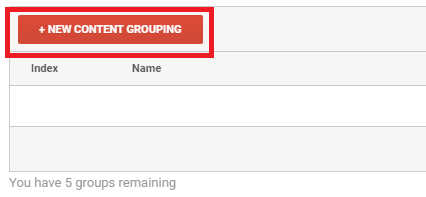
In this section, click on the New Content Grouping button:

We then need to build the criteria for our AMP traffic.
So, give the group a name, we will use AMP Content Grouping. Then under Group Using Rule Definitions, give the definition a name, we will use AMP Traffic and then define the rule as Page > Contains > /amp/ – this is assuming your AMP traffic is using /amp/ as its page redirection. If you are using something different, make sure you enter it correctly here.

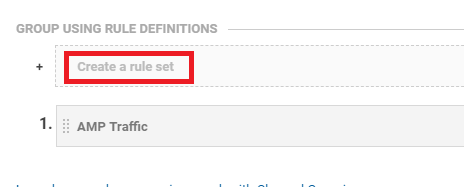
We then need to create our definition for non-AMP traffic. So click on Create a new rule set:

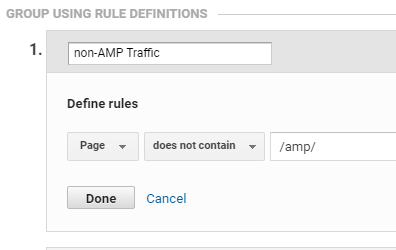
Then give the definition a name – we are going to use non-AMP traffic. then we need to set the rule as the opposite as our AMP Traffic rule. So, Page > does not contain > /amp/

Then click on the Done button. You should now have two rile definitions, one for non-AMP Traffic and one for AMP Traffic:

You can then go ahead and click on the Save button.
Viewing the Reports
Come out of the Administration part of your Google Analytics and then click on the Behavior menu option then click on Site Content and then All Pages:

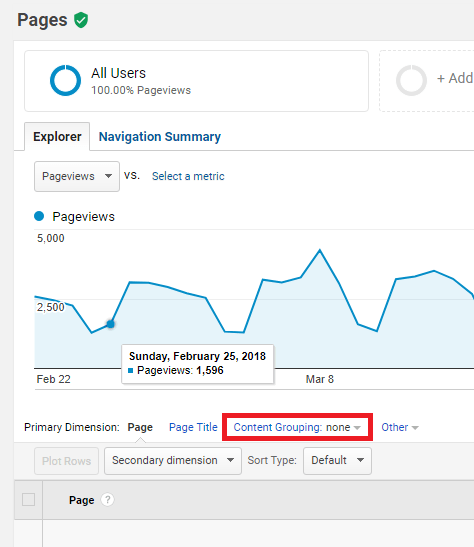
You will now see the Content Grouping option on the report:

Go ahead and click the none dropdown and select the AMP Content Grouping you have just created:

You should now see the report with the two definitions shown, one for non-AMP traffic and one for AMP traffic. At this point, we would love to show you a screen shot, but we cant – because we do not use AMP so we do not have any AMP traffic! But trust us, if you are using AMP traffic, you will now see the two sets of data.
You can then just use it as it is or start to costomise the report further to suit your requirements.
Feedback
We would love to hear your feedback on this article so come and join us on Facebook or Twitter and let us know what you think!
Share this content:

What do you think of GA4 for Amp ?