Last updated on September 9th, 2025 at 11:09 pm
Estimated reading time: 6 minutes
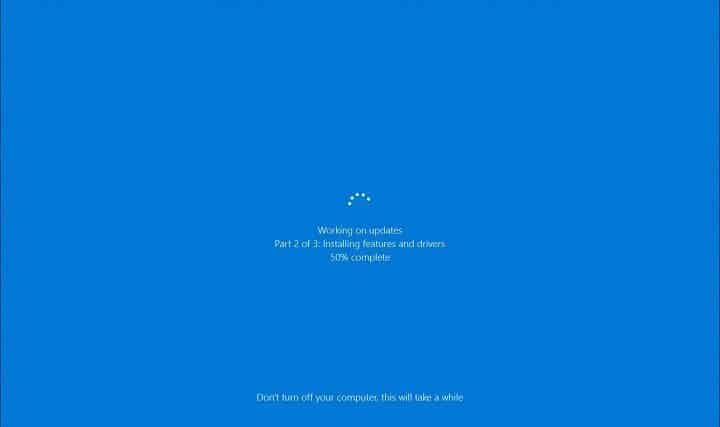
With the release of new updates for Windows, you may run into a problem that we have seen with Windows 7 in the past, where the update seems to get stuck and go no further. This is usually at the screen like the one below:

In some cases, this may just be a slow install and will take some time to complete, however, this might not go away and could be a corrupt update and most people outside of the IT world usually take full notice of the “Don’t turn off your computer, this will take a while…” message and we have known clients leave machines on this screen for days in the hope that it will eventually start working. It is a judgement call on your part on how long you think your computer should have taken to install this update. Personally, after 3 hours I would think that there is definitely an issue!
Video Demo
Before going into the full written guide, you can check out the video demo below which shows the fix being carried out on a Windows 7 machine. The process is almost identical and may help you in understanding the full process.. You should carry on to read and take notice of the full guide below, though as this has the advanced details on how to carry out this fix correctly on Windows 10.
So, what do you do?
Well, the first thing you will need to do identify that you actually have a problem and that your machine is not actually doing as it says. Sometimes, updates can be very large (especially these “Feature Updates“) so you need to be sure that you machine is actually stuck. What we usually advise is that if your computer has been stuck on a message similar to the one above and has not changed for around 3 hours then it certainly has a problem that will need to be acted on.
Once you are convinced you have a problem, you should power off your machine. This means holding down the power button (on your computer not a monitor which we have seen people do!…) for around 10 seconds. You should notice that you computer will completely shut off. Now – turn it back on again.
This should now take you straight back into Windows, if not, go into Safe Mode (click here for how to get into Safe Mode for Windows 10) – if you are very unlucky then the update may have screwed up your computer and it may be time for a rebuild. But lets assume everything is ok and you are now back into Windows.
I am back in Windows but what now?
Do not turn off your machine or reboot it as you will just get stuck on the “Working on updates…” message again. The reason this is happening is because of a corrupt update or a corrupt update database. Either way, the fix is pretty simple if you have a basic understanding of computers.
There is a folder under the Windows directory called “SoftwareDistribution“. This folder is where all Windows Updates are downloaded to and run from as well as the Windows Update database being in here. So, if it is corrupt, we need to get rid of it and recreate it from scratch – this will fix your problems.
How do I recreate my Windows Update SoftwareDistribution Folder and Database?
First of all, you cannot just go in and delete or rename the folder, there is a Windows Update service running that will stop you from doing this. So, the plan is to stop the service, rename the current folder, start the service again which will then in turn recreate your SoftwareDistribution folder and Windows Update database.
To do this, you should follow these steps:
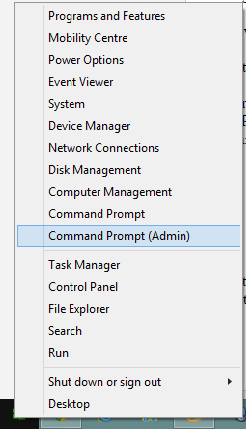
First, start an elevated command prompt, to do this in Windows 10, just right click the bottom left corner Start button and click “Command Prompt (Admin)“:

Then you will be presented with a back box that looks like this:
You then need to stop the Windows Update service, so you should type in the following command:
net stop wuauservOnce this is complete, you then need to rename the current SoftwareDistribtion Folder in the Windows directory. So, assuming your Windows is installed on the C: drive, you should then type in this command and press enter:
ren c:\windows\softwaredistribution sd.oldThis will rename the folder to sd.old in your C:\Windows folder – you can later delete this folder once you are happy everything is working to save you some disk space but it is not critical that you delete this folder if you do not want to.
The final part of the fix is to restart the Windows Update service. To do this, you should type in the following command and press enter:
net start wuauservOnce this has restarted, you should now notice that the SoftwareDistribution Folder has been recreated – you should now restart your computer and you should notice that it reboots without any problems.
But wait – there is one last thing that you need to be aware of. As you have now completely removed the old SoftwareDistribution database, when you next run Windows Updates, it will not know that it has been run before and may through an error. Ignore this and just click “Check for Updates“. It will then check the machine, see that it has a number of updates and catch up with itself again.
But what if I work in IT and need to fix loads of machines?
Simple, you can either use Group Policy, create a batch file or use a system like Configuration Manager. For some clients we have pushed this fix out using a Configuration Manager Task Sequence and it works perfectly.
How to get into Safe Mode in Windows 10
Simply click the link below to our guide on how to boot Windows 10 into Safe Mode:
How to Boot Windows 8/10 into Safe Mode
Comments
If you have any comments or questions about this, please feel free to leave us a message in the comments section below below.
Discover more from TechyGeeksHome
Subscribe to get the latest posts sent to your email.
