Estimated reading time: 4 minutes
Introduction
Although this is a fairly simple process for more experienced computers users, we have been asked this question a few times over the last few weeks.
This seems to be due to more and more people getting network storage devices for Christmas and, instead of using the rubbish software you get with these devices to access your data, they just want to have a network drive to access it like most people have at work.
Creating a Network Drive
Drive Letter
The first thing you will need to consider when mapping a network drive is; what drive letter to use.
Most computers use the lower end of the alphabet for their own devices, like C: drive for the local disk D: or E: for optical drives and then follow on from there for devices like USB pen drives.
So it is best to avoid the lower end of the alphabet and go for something in the last third instead. For the purposes of the guide, I’ll be using the S: drive.
UNC Path
The second important piece of information you will require is the UNC path to your share. This is usually either an IP address or DNS name followed by the share name. For the purposes of this guide, I’ll be using the IP address and share name of filestore, which would like like this:
\192.168.0.125FILESTOREThis is where the IP address (192.168.0.125) is the IP of my network storage device and FILESTORE is the share I have created on it where I want to map my S: drive too.
Windows Mapping
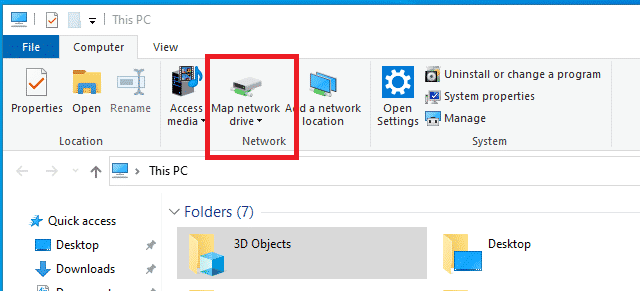
To create the S: drive mapping in Windows, you will need to open up the File Explorer and then on the top ribbon, click on Map network drive:

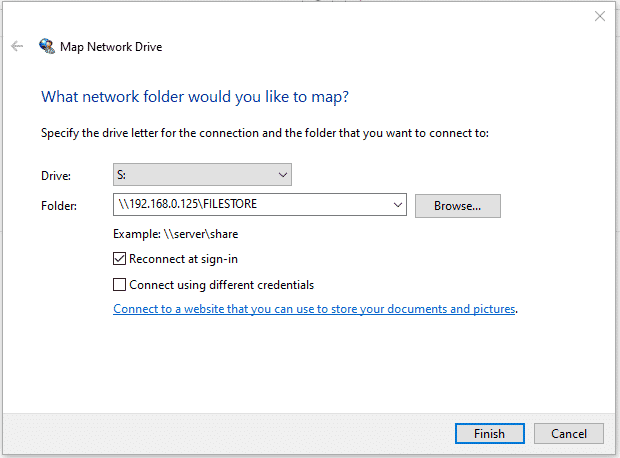
This will then bring up the Map Network Drive wizard. Using the drop-down, change the network Drive letter to the S: drive. The in the folder text box, enter the full UNC of the share you want to map the S: drive to. So it should look similar to this:

You can leave the Reconnect at sign-in tick box ticked if this is what you want to happen. If you do not want the drive to be reconnected at next login, then untick this box.
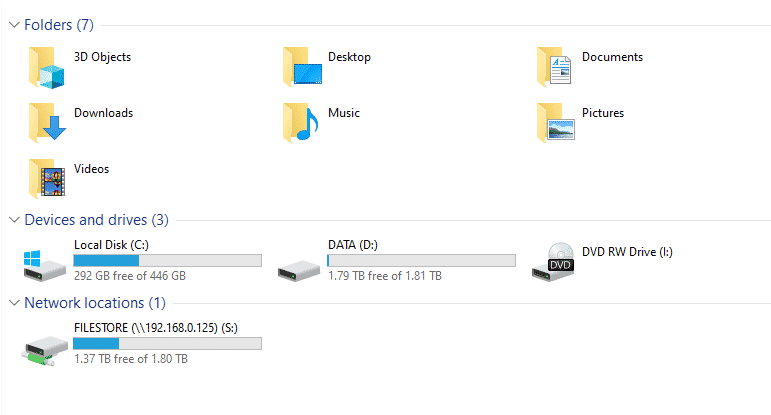
Go ahead and now click the Finish button. This will then go ahead and map the drive letter to the UNC path. If you now go back into File Explorer, you should see the newly created S: drive:

Command Line Mapping
There is also another way of mapping a network drive using the Windows Command Prompt. You will require the same information as for the Windows mapping, the IP address and the share name.
Open a Windows Command Prompt and enter the following command:
net use S: \192.168.0.125FILESTOREwhere:
- S: = the network drive that you want to use for the mapping
- 192.168.0.125 = the IP address of the network storage device
- FILESTORE = the share name on the device
So it should look fairly similar to this:

Now go ahead and hit the Enter key on the keyboard and it should then successfully map the network drive:

The network drive will then appear in File Explorer as the S: drive.

Conclusion
There are a number of other ways to create network drive mappings like using scripts and batch files, but these are the two most simple methods of doing this.
If you have any trouble with anything in this guide, please leave us a message below in the comments section and we will get back to you as soon as we can.
Share this content:
