Estimated reading time: 4 minutes
To secure a website is a need of the hour. There is absolutely no reason for a website not to switch from HTTP to HTTPS. It protects a website from getting its data stolen by malicious third parties, plus, it boosts page rank in search engines.
HTTPS is an extension of the usual HTTP address, and it’s short for Hypertext Transfer Protocol Secure. It uses encryption to secure communication between servers and browsers, thanks to the help of an SSL certificate.
These encryptions are created so intruders cannot tamper with the communication – like injecting third-party ads – or harvest sensitive data.
Methods to Secure A Website:
In this article, I will explain how to secure a website in 5 easy steps.
1. Buy an SSL Certificate
To migrate from HTTP to HTTPS, an SSL certificate is necessary. It allows the aforementioned encryption to secure your data when transferred from servers to computers.
There are a lot of ways to get an SSL certificate to secure a website. Buy a premium certificate and choose from different SSL types to suit the website’s needs. Or, get one free of charge through SSL for Free.
Buying and installing an SSL certificate can be tricky. A way to simplify this is to pick a web hosting solution, such as Hostinger, that provides you with a free SSL certificate and a simplified installation process. However, if you don’t have an option like that, here’s what to do next.
2. Install the SSL Certificate
If your hosting plan comes with a free SSL certificate, all you need to do is click the SSL icon on the control panel, enter your domain name, and it will set up on its own.
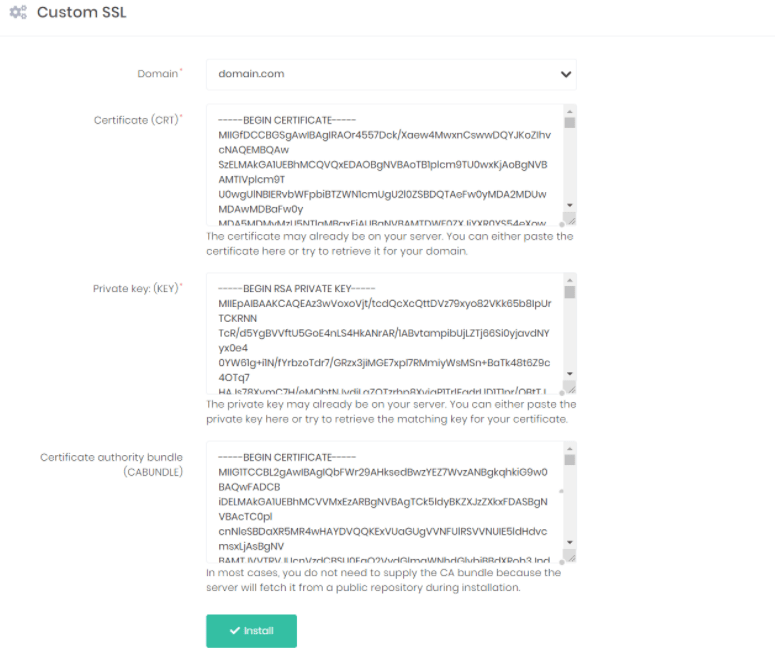
However, if you have your own SSL certificate, there might be some additional steps. Click on the SSL icon, and it will display a Custom SSL page where you can install your certificate.
You will find three different files in the certificate you have downloaded – CRT, KEY, and CABUNDLE. To set it up on your website, copy and paste the code in these files to their respective columns in the Custom SSL page, then press install.

3. Change All Internal Links From HTTP to HTTPS
Now that the SSL certificate is installed, change all internal links to HTTPS. This is to ensure that all data in all of your pages are encrypted for secure transfer.
If you use WordPress or another CMS, there is a URL changer tool that can help you do that. I recommend using this, especially when you have hundreds of pages to setup.
However, if you don’t have a lot of pages, you can change the URLs manually. Do this by going through the website files manually or executing a script.
4. Set Up 301 Redirects
301 redirects are useful when you have sites that backlinks to your page. As you can’t manually change your link attached to someone else’s site, 301 redirects ensure that your page backlinks are rerouted permanently to the HTTPS address.
Usually, this is taken care of by the hosting provider. If it does not come with the hosting package, you can simply access the .htaccess file in the root folder and add this code snippet:
RewriteEngine On
RewriteCond %{HTTPS} off
RewriteRule (.*) https://%{HTTP_HOST}%{REQUEST_URI} [R=301,L]
5. Test the Site
Finally, test your page to ensure that it is already secured. Simply visit any page of your own, you will know it’s done if you see a padlock icon on the left corner of the browser’s address bar.
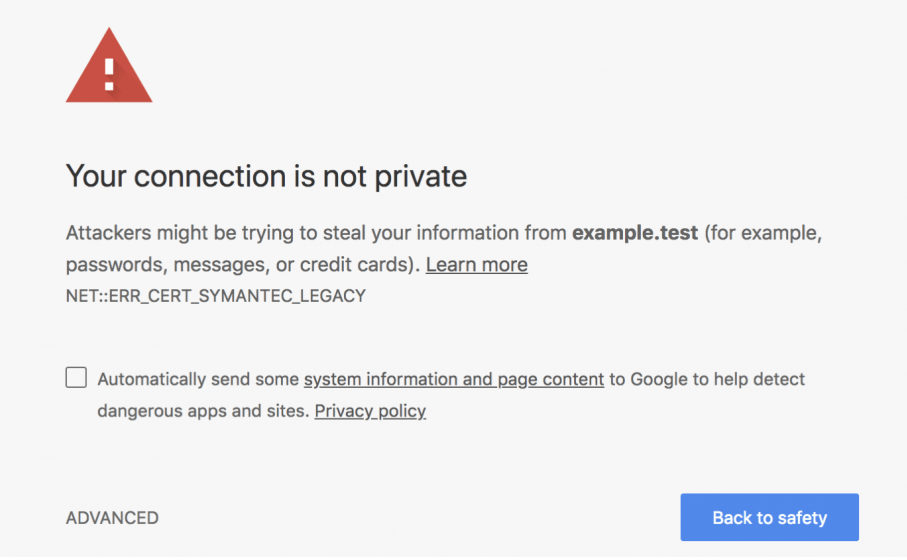
Make sure to check on more than one page to detect errors. If any, your browser would probably display a warning that says “your connection is not private” or “this website has been reported as unsafe.”

If it happens, check if the link of the page is already in HTTPS. Or, see the SSL on your website and make sure that it has been installed correctly. Additionally, check if you might be experiencing a mixed content error. In this way you can secure a website.
For running a successful website it is mandatory to secure a website. So we must secure a website to protect if from hackers and other attacks.
Share this content:
Discover more from TechyGeeksHome
Subscribe to get the latest posts sent to your email.
