Estimated reading time: 4 minutes
The other day, my best friend screams on the phone asking how to recover deleted photos from iPhone? Well! She had no clue, that she deleted a photo containing important information and needed it urgently. By the time she discovered that the photo is lost and she doesn’t have a backup/copy, she was going crazy with stress. If you or any of your loved ones have been there and facing that, then you must realize the gravity of the situation and might be looking for the right way to recover deleted photos from iPhone.
Though, iCloud and iTunes are the most viable options beyond the 29 days’ limit of the ‘Recently Deleted’ folder. These options turn futile as restoring the lost file would eventually overwrite the existing iPhone data. Moreover, photos are larger in size and restoring would make the unwanted photos from your iCloud to occupy more memory space and consume more time. But, there is nothing to fret about. If you want a better solution, I highly recommend you brilliant software which I recommended to my friend too. It is Tenorshare UltData. With the help of which, I could help her in getting back her delete photos from iCloud without overwriting the old data and thus suggesting you to use this without any extra thoughts.
Tenorshare Ultdata will use the ‘Recover from iCloud Backup File’ feature for iPhone photo recovery. Unlike other software in the market, it has selective preview and restore features within for restoring the lost or deleted data from your iPhone. In addition, apart from iCloud backup, you can retrieve lost data from the iOS device and iTunes backup file. There is no need to worry about what to do when you don’t have backup when you have the possession of this tool which is the best thing I liked about this professional software.
Not just photos, the tool can support 30 types of data and get them retrieved using Tenorshare UltData including SMS, FaceTime, photos, videos, music, call logs, or app data. Whether a Mac or Windows PC or your iPhone, it can restore the deleted photos/data to it, as per your convenience selectively. Not only iPhone, it supports iPad and other iOS devices too. So, in case you want to recover deleted photos from iPad, you can use this tool too. And all these special features make this tool stand out from other out there.
Step-by-Step Tutorial
In case the above method seems tough to understand, here is the detailed and simplified guide for Tenorshare UltData to recover deleted photos from iCloud –
Step 1: Get Tenorshare UltData on your system
Install the software on your Mac or Windows system. After installation, launch it and get a USB cable for connecting your iPhone to the computer. Then tap the ‘Recover from iCloud Backup file’ tab from Tenorshare UltData interface.
Step 2: Select your backup file
Now, the iCloud login page appears, where you need to key in the iCloud credentials and then press the ‘Next’ button. The screen will now display all the iCloud backup files. Select the most relevant iCloud backup from there.
Step 3: Select the file types (Photos here) from iCloud backup
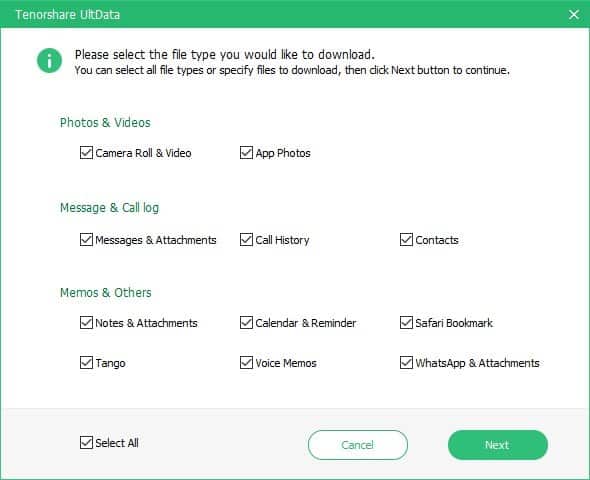
On the UltData interface, tick the checkboxes beside ‘Camera Roll & Video’ and ‘App Photos’. Click on the ‘Next’ button after that and leave a moment to get the photos downloaded. The time Tenorshare UltData would take to download the photos depends on the file size.
Step 4: Scan the photos and extract the deleted photos
Once UltData is done with the downloading process for photos, automatically the scanning process will start. Now, select ‘Photos’ and ‘App Photos’ from left panel by marking the respective check boxes. With checking each data type, you can preview all the deleted photos from the iCloud backup.
Step 5: Extract the deleted photos
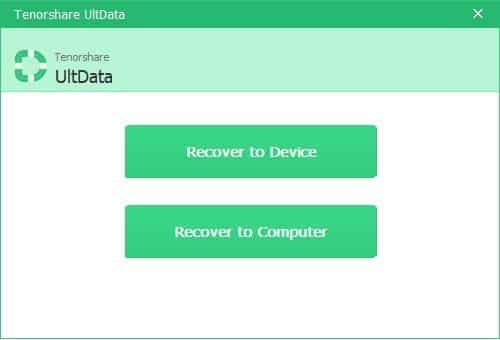
From the preview, select the photos you want to extract and then hit the ‘Recover’ button. A popup window will follow, asking you to choose ‘Recover to Device’ or ‘Recover to computer’. Click on the desired option.
From the above article, we felt that whatever be the data loss scenario, whether you have a backup or not, there is only one solution that can beat the data loss blues! Tenorshare UltData comes with the most cherished feature, i.e. no data loss during restoring data or repairing the iOS. Whether you have an iTunes, iCloud backup or want to recover photos from your iPhone/iPad. It can make it happen without any hassle.
Share this content:
Discover more from TechyGeeksHome
Subscribe to get the latest posts sent to your email.


