Estimated reading time: 6 minutes
No one can neglect the importance of backups. Operating a website without any backups means you are always at high risk. Just consider the situation that a virus badly hit your website and messed up your site layout or a hacker hacked into your website and delete your content, then what will you do?
No matter what type of website you are running, if it is important to you then you must create backups.
Backup is a copy of all of your website data and stored it in a different place. The sole purpose behind creating backups is to secure your efforts that you spend on the website. A complete backup of a WordPress website contains images, themes, plugins, posts, and databases, etc. A backup allows you to restore your website back to a specific position when you created that backup.
The backup consists of two things: databases and Website files. So a full site backup means it includes both website files (WordPress CMS files, media, CSS, PHP, and Plugins) and databases (pages, posts, and comments).
So for example, if you just create the backup of your website files and then some hacking attack deleted your website pages then restoring that backup will only restore your website files, not the database. Therefore it is always encouraged to create a full backup of your WordPress website.
However, it’s not just enough to create backups. You need to keep more than one copy of the backup and save them at more than one location. For example, you can keep a copy on your computer hard drive and another on the cloud storage like Google Drive.
Luckily it is now easy to create a complete backup of your website without getting into any technicalities. Even if you are a novice user below is the simple and easy way shared by BloggingSilo for creating a backup of your WordPress website.
Creating Backup Using WordPress Plugin for Free
There are many free and paid backup plugins. Both are good however paid plugins are richer in features like it allows you to automatically store backups at multiple locations and dedicated storage space.
If you don’t want to invest in any paid WordPress backup plugin there is nothing wrong to use the free backup plugin.
UpdraftPlus is a well-known and trusted WordPress plugin for creating backups effortlessly. A large number of people are making use of it. It has more than 3+ million active installs.
By following the below step by step procedure you will be able to create a backup of your WordPress website for free.
- Login to your WordPress website dashboard and then go to Plugins > Add New.
- Search for UpdraftPlus and then hit the “Install Now” button.
- After installing make sure you “Activate” the plugin.
- Once you have activated the plugin go back to WordPress dashboard and then Settings > UpdraftPlus Backups.
- After clicking, you will see a UpdraftPlus page where you can access its features and settings.
- Go to the Settings tab there.

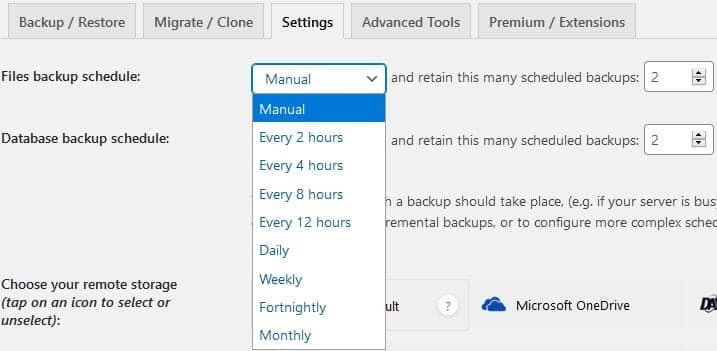
- In the Settings tab, you can select the duration of automatic backups, storage location, and the files you want to include in the backup. The plugin also permits you to set the number of copies you want to retain in the storage remote location.
The best part of this plugin allows free users to automatically backup files and databases every 4, 8, or 12 hours, daily, weekly, fortnightly, and monthly.

It is recommended to backup both databases and website files. For the question of how often the plugin should create a backup, the answer depends on how often you update your website content. Like if you are updating site content on daily basis then it is wise to set daily automatic backups.
- After setting the automatic backups schedule and retain copies, scroll down a little bit to configure where you want to store your website databases and files.
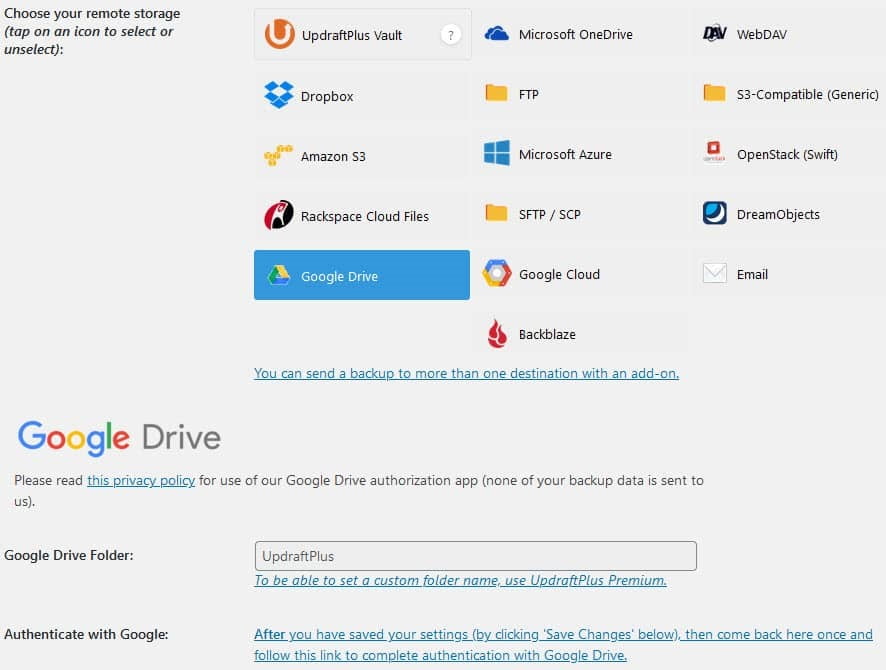
- UpdraftPlus supports tons of storage services like UpdraftPlus Vault, Dropbox, Amazon S3, Google Drive, and many more where you can save your backups.
- Google Drive is a well-secured place so for the sake of the tutorial let’s say we choose Google Drive. So go ahead and select Google Drive.
- Once you select your remote storage location the integration settings appear slightly below as shown in the image.

- Here you don’t need to do anything so just scroll down to the end and click on the Save Changes button.
- Now you will see a popup will appear on your screen.

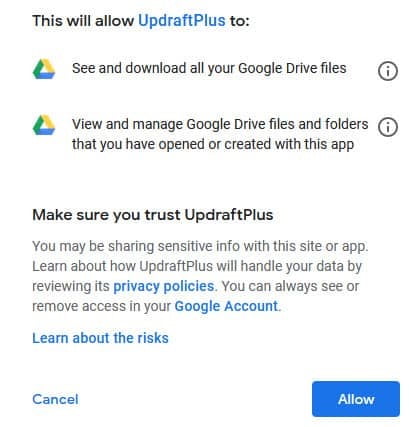
- Click on the link given in the popup. You will be asked to log into your Google Account where you need to grant some permissions to UpdraftPlus which allows it to manage the files created by UpdraftPlus. Just click on Allow.

- Congratulation you are at the last step just click on the “Complete setup” button. That’s it.
Now, whenever the UpdraftPlus create backups either automatic or manual it will be stored on the Google Drive that you linked.
By following the above method you have scheduled the automatic backups but what if you want to make a manual backup. It is useful when you want to create a backup now instead of waiting for the automatic backup schedule to create a fresh copy of your website files and databases.
Fortunately, where the UpdraftPlus makes it straightforward to create automatic backups they also designed an effortless manual backup procedure.
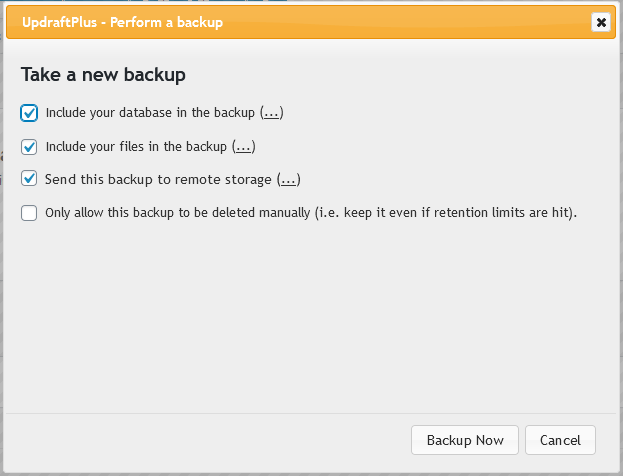
- So on the same page where you access the UpdraftPlus settings, you will see the Backup / Restore tab. Click on that and then you will see a Backup Now button.
- After clicking, a popup will appear on the screen where you can select the files that you want to include in the backup. The default settings are fine on the popup so just go ahead and click on the Backup Now button.

Backup Restoration
So far we have learned that how you can automatically and manually create a complete backup of your WordPress website.
Now of course you also want to learn how you are going to restore a backup if something wrong happened to your website. Luckily that process is more simple than creating a backup.
- Go to UpdraftPlus Backup / Restore.
- Scroll down and you will see the list of backups that the plugin has created so far. It shows both manual and automatic backups.
- For restoring a specific backup just hit click on the restore button given with it as shown below.

- You will be asked what you want to restore. Like if you just want to restore plugins you can do so. If you want to restore a complete backup then make sure you check everything.

- After that click on the Next and then Restore button. That’s all.
So if you want peace of mind security then a backup is one the measure that you must take. With such an amazing and reliable free WordPress plugin UpdraftPlus there is no reason left behind of not creating backups. So if you worth your time and efforts then go ahead follow the guide and make a backup of your WordPress website.
Share this content:
Discover more from TechyGeeksHome
Subscribe to get the latest posts sent to your email.
